

UserDeck offers flexible options for sending outgoing emails to your customers. Outgoing emails are sent when you reply to an email conversation or start a new email conversation with your users. You can use UserDeck's built-in email system, connect your Gmail account, or configure your own custom SMTP server for a more customized experience.
This article guides you through setting up outgoing email in UserDeck, covering each option and explaining the benefits of configuring SPF, DKIM, and DMARC records for your domain.
Choosing Your Outgoing Email Option
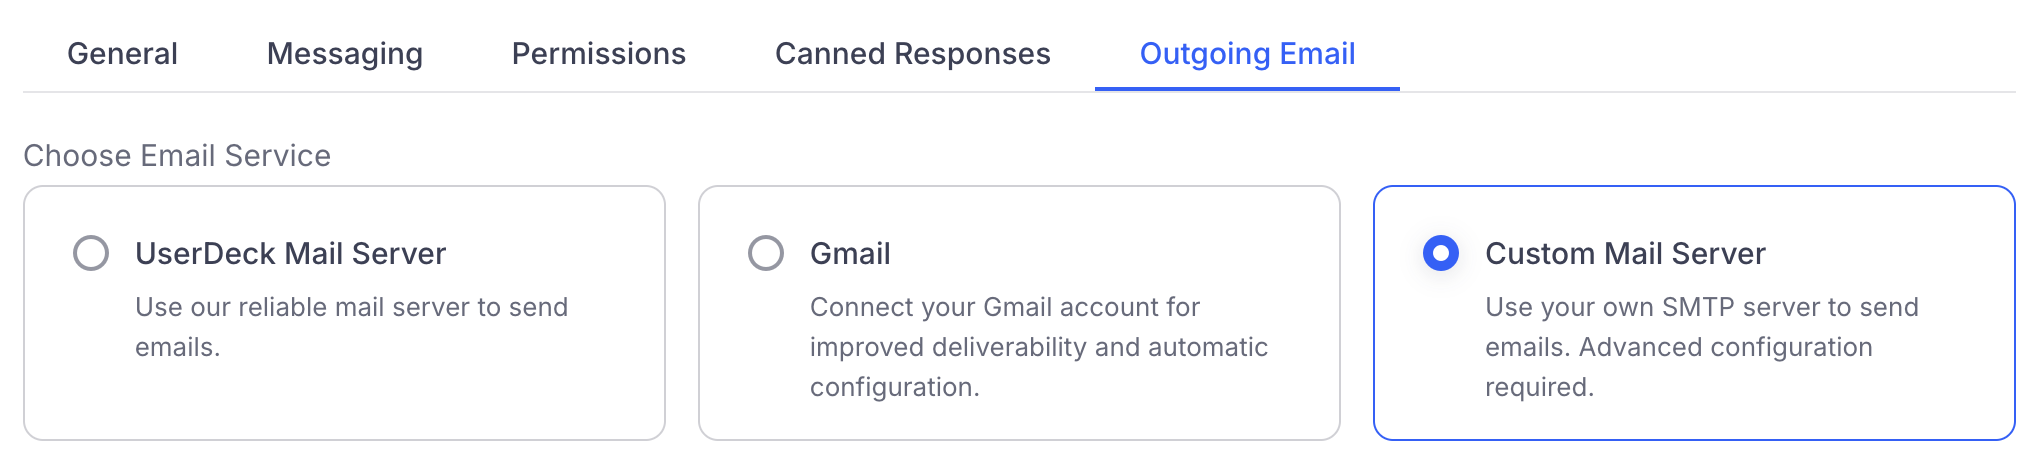
Navigate to the Outgoing Email tab within the Settings menu. You'll see three options:

UserDeck Mail Server: UserDeck's reliable mail server is a quick and easy way to start sending emails. By default, UserDeck uses it's own mail servers to send replies when you reply to a conversation.
Gmail: Connect your Gmail account and send replies using your Google Workspace for improved deliverability. This simplifies setup and leverages Gmail's infrastructure.
Custom Mail Server: For users that want to use their email system outside of Gmail using the SMTP protocol. NOTE: This may require more technical configuration to ensure SMTP is properly configured with your email service.
Choose the option that fits your situation best. If you're unsure of what to do, you can always continue to use the UserDeck mail server and follow the setup steps below for that to ensure the best deliverability.
1. UserDeck Mail Server (Default)
UserDeck's mail server is the default and easiest way to begin sending emails. It requires minimal setup, just choose the "UserDeck Mail Server" option as your outgoing email service. To maximize deliverability though, configuring SPF, DKIM, and DMARC records with UserDeck is highly recommended (explained later in this article).
2. Connecting Your Gmail Account (Recommended)
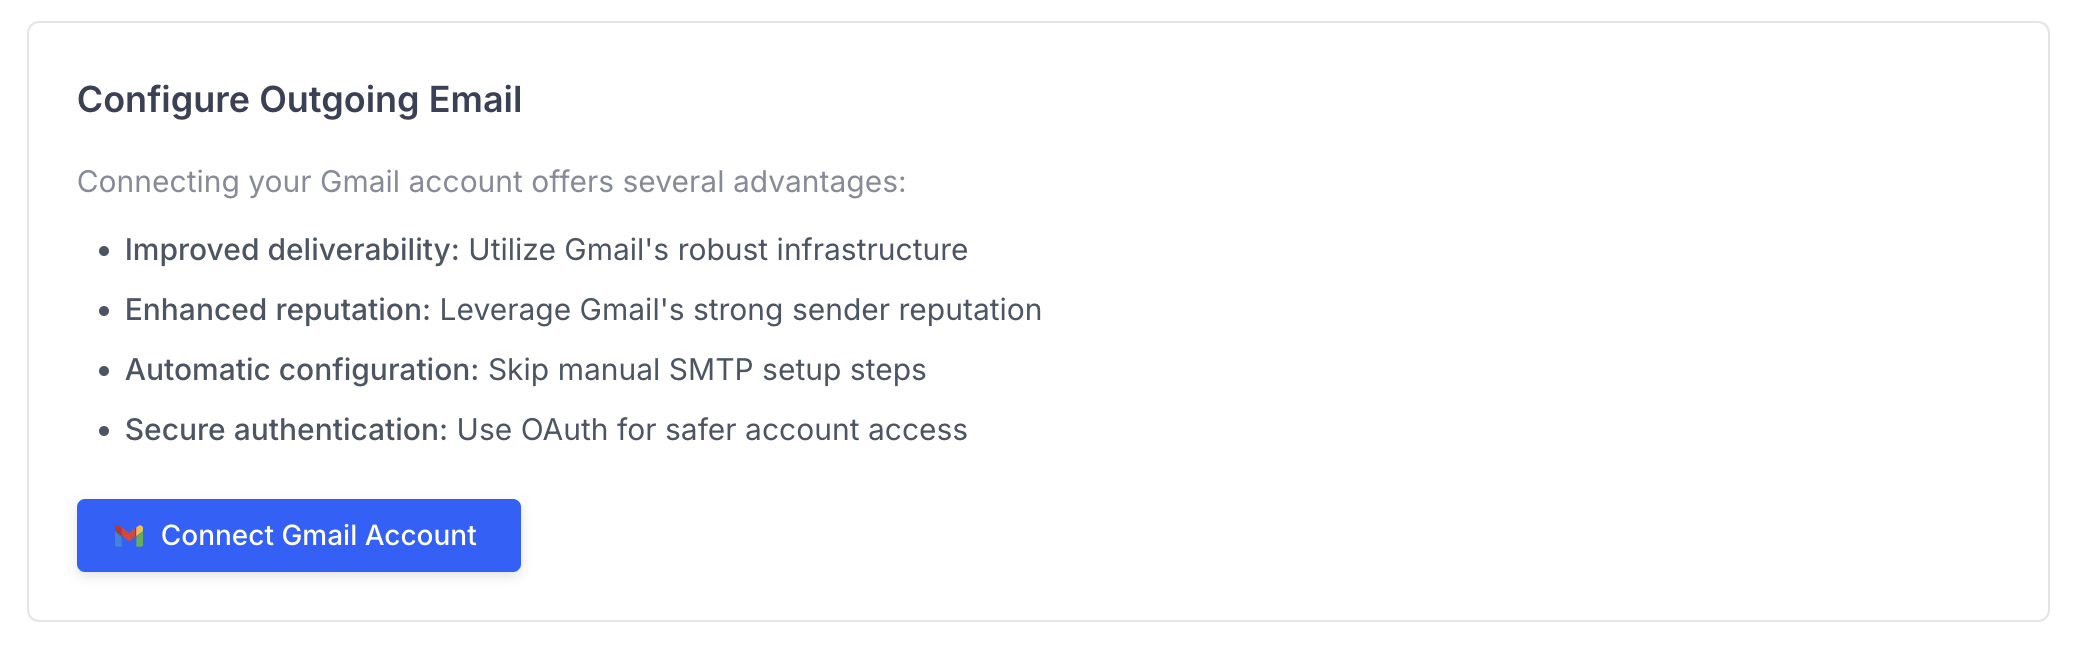
Connecting your Gmail account offers significant advantages:
Improved Deliverability: Benefit from Gmail's robust infrastructure.
Enhanced Reputation: Leverage Gmail's strong sender reputation to reduce spam filtering.
Secure Authentication: Use OAuth Authentication for safer account access and removing the need to share your account credentials with us.
To connect your Gmail account:
Select the Gmail email service option.
![]()
Click the Connect Gmail Account button.
![]()
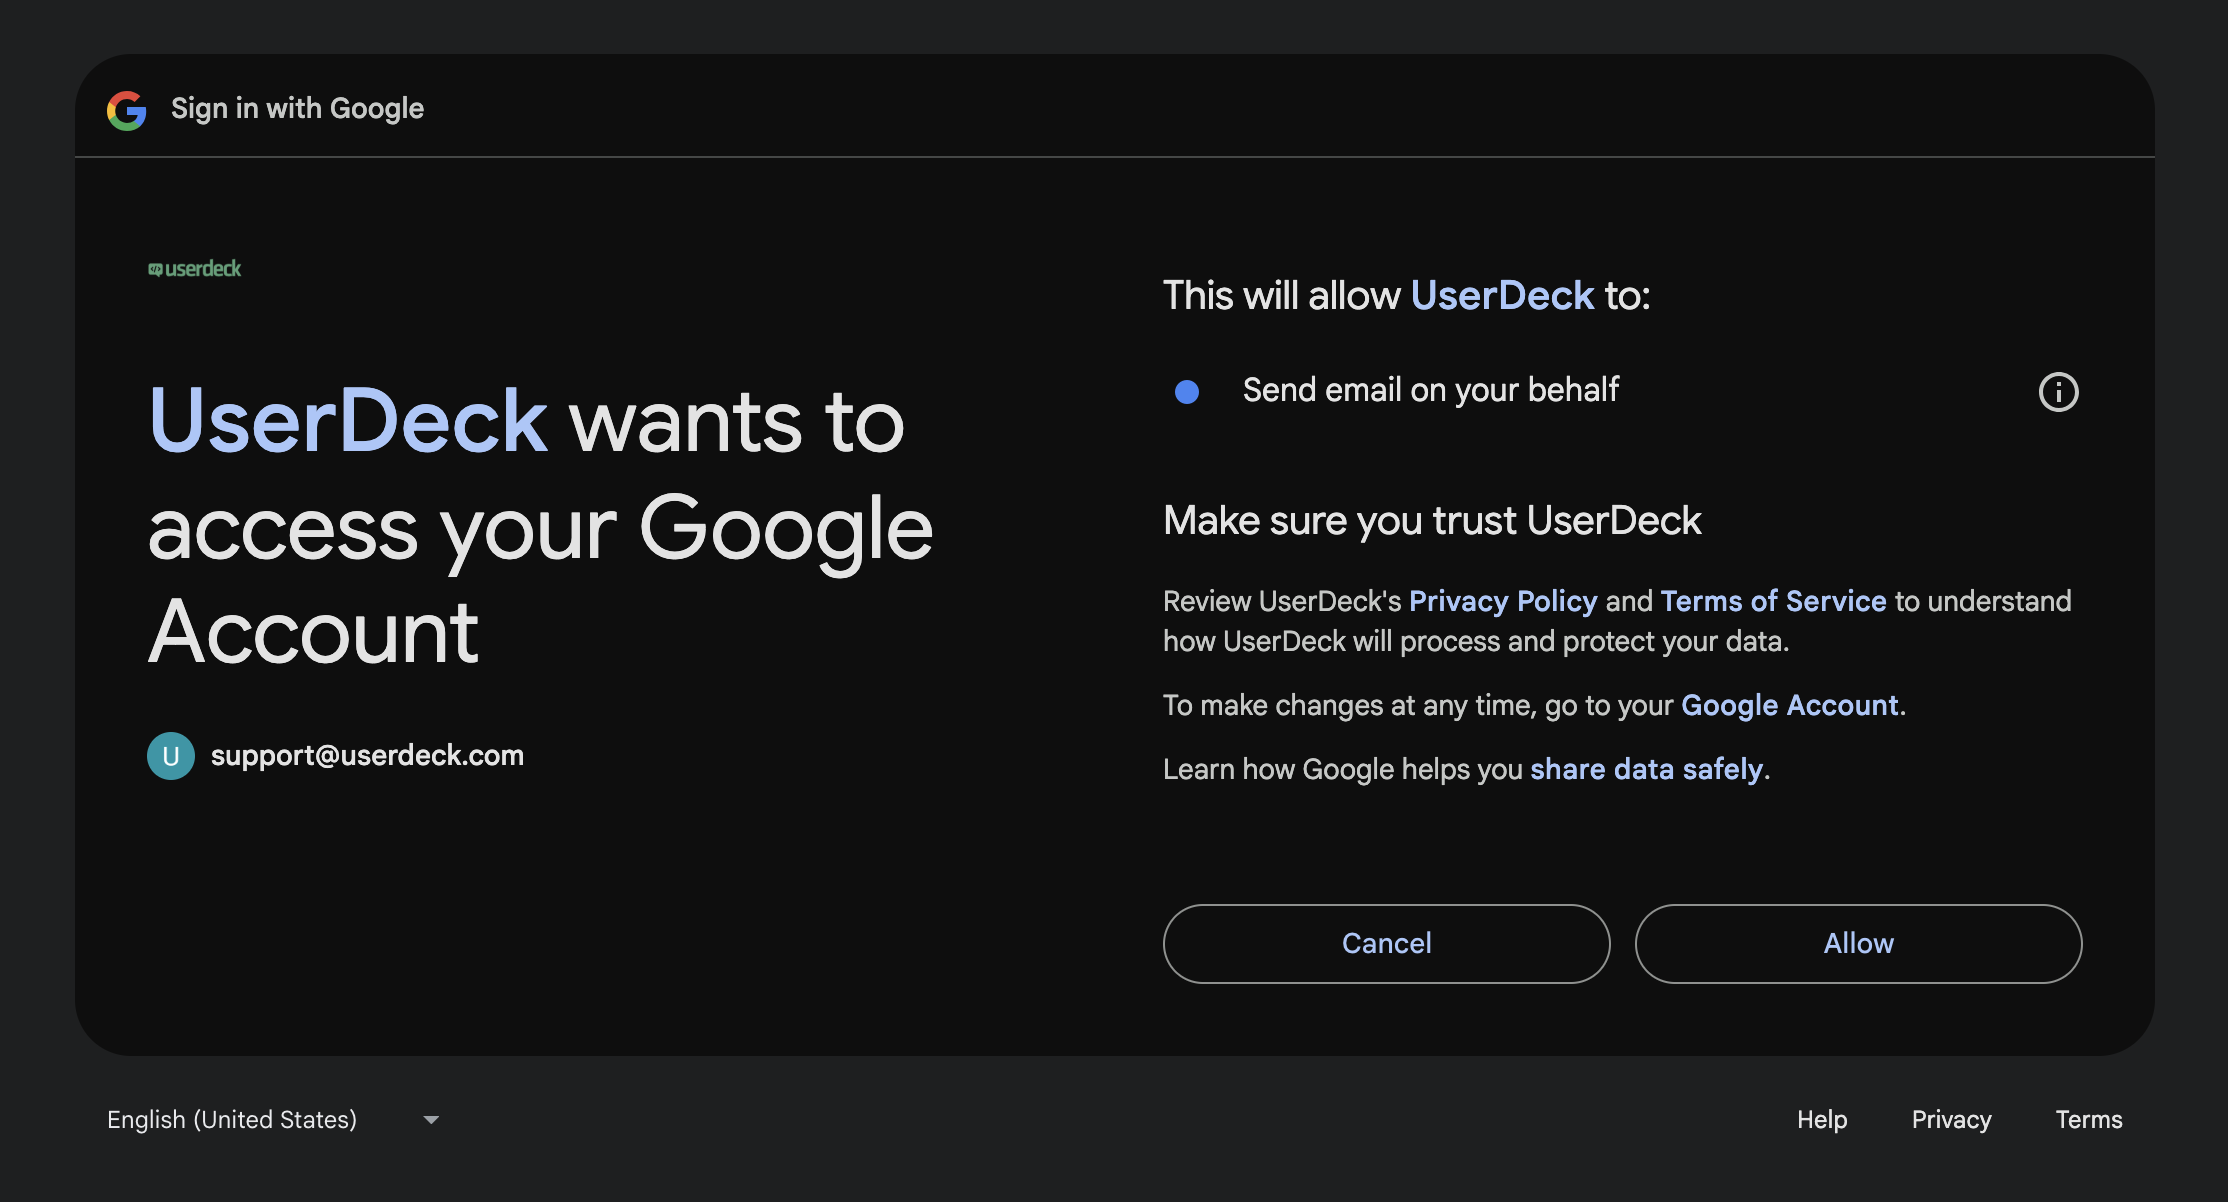
Follow the on-screen instructions inside the Gmail screen that appears to log in and allow UserDeck to use your Gmail account to send emails. Select the "Allow" option when presented with the permission for UserDeck to send emails on your behalf. This permission is required to be able for UserDeck to send emails using your Google account.
![]()
Save your Email Server Change
Configure SPF, DKIM, and DMARC for your domain (see Gmail-specific instructions below)

3. Setting Up a Custom Mail Server
For maximum control, you can use your own SMTP server. Please note, you'll need to check with your email provider on the proper way to ensure you have the correct SMTP details. Often times, you'll need both the connection details as well as to follow instructions on setting up an SMTP password that may be different than your regular account password. Refer to the SMTP details section below for all of the information you'll need.
Choose the Custom Mail Server option inside the email service area.
![]()
Enter SMTP Details: Fill in the following information in the SMTP Configuration section:
![]()
SMTP Host: Your SMTP server's hostname or IP address.
SMTP Port: The port number your SMTP server uses (common ports: 25, 465, 587).
Username: Your SMTP server authentication username.
Password: Your SMTP server authentication password.
Encryption: Select the encryption method (TLS is recommended, but select the option supported by your email provider).
Save Settings: Click Save SMTP Settings to apply your configuration.

Important Considerations for Custom SMTP:
Accuracy: Double-check all SMTP details for accuracy. Incorrect information will prevent email sending.
Server Requirements: Ensure your SMTP server is configured to accept connections from UserDeck. Consult your email service's documentation.
Firewall: Verify your firewall allows communication on the specified SMTP port.
Enhancing Email Deliverability (All Options)
Email authentication is crucial for modern email delivery. Without proper authentication, your support emails may:
Land in spam folders
Get rejected entirely by recipient servers
Damage your domain's sending reputation
Create security vulnerabilities for phishing attacks
Configuring these three authentication methods ensures your emails are trusted, delivered, and protected from impersonation. Regardless of your chosen option, configuring SPF, DKIM, and DMARC is highly recommended. These email authentication methods improve deliverability and reduce spam filtering.
What are SPF, DKIM, and DMARC?
SPF (Sender Policy Framework): Verifies authorized mail servers sending emails on behalf of your domain. It's like a guest list that tells receiving servers which IP addresses can send mail for your domain.
DKIM (DomainKeys Identified Mail): Adds a digital signature to emails for verification of origin and integrity. This cryptographic signature proves your email wasn't modified in transit and genuinely came from your domain.
DMARC (Domain-based Message Authentication, Reporting & Conformance): Builds on SPF and DKIM, specifying actions for failed authentication (e.g., quarantine, reject) and providing reporting mechanisms. It's your policy for how receivers should handle unauthenticated mail claiming to be from your domain.
Configuring SPF, DKIM, and DMARC for UserDeck Mail Server
If using UserDeck's mail server:
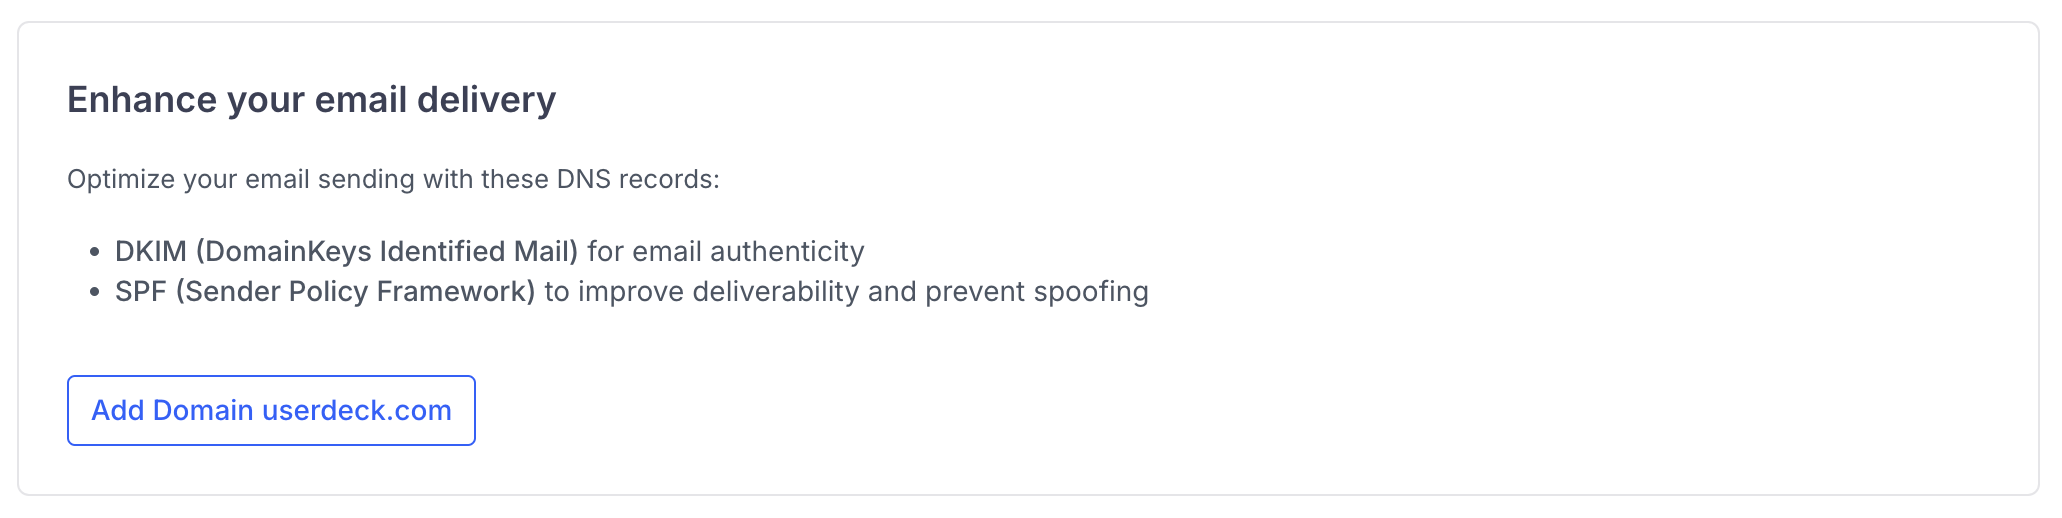
Locate the "Enhance your email deliverability" section inside the Outgoing email settings of UserDeck
![]()
Select the "Add Domain" button
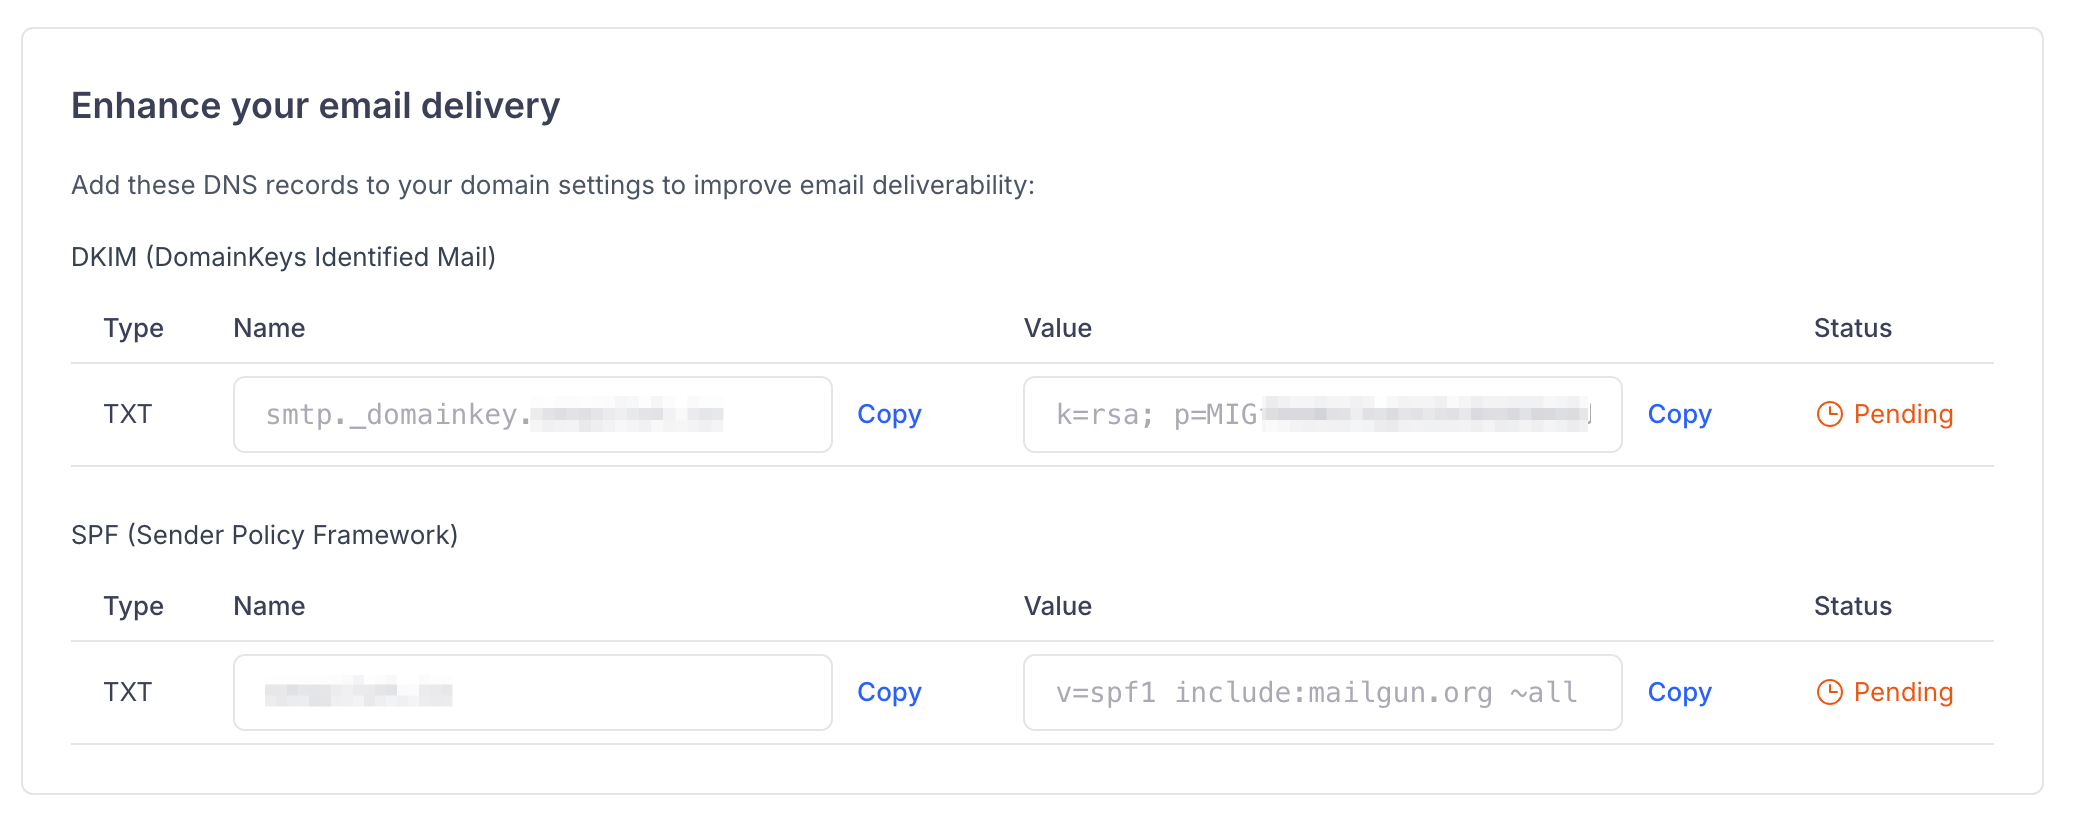
A new section providing SPF and DKIM records with you to add to your domain will appear, similar to the following:
![]()
Log into your Domain name provider - Log into wherever your Domain's DNS settings are managed (usually through your domain registrar (such as Godaddy, Namecheap, etc) or in some cases, your website hosting provider depending on your website setup)
Access DNS Records: Inside your Domain provider, access your domain's DNS management settings (talk to your domain provider or host for specific instructions
Add DNS Records: Copy the SPF and DKIM values provided by UserDeck and add them to your domain's DNS records as shown below (Note these are general instructions, please speak with your Domain registrar or host for help if you are unsure about how to add these values with your particular service.
Adding SPF Record:
Create a new TXT record
Name/Host: @ or leave blank (represents your root domain)
Value:
v=spf1 include:mailgun.org ~allIf you have an existing SPF record, merge them by adding include:mailgun.org to your existing entry like the following (assuming the Google Entry already exists):
v=spf1 include:mailgun.org include:_spf.google.com ~all
Adding DKIM Record
Create a new TXT record
Name/Host: (as specified in your UserDeck Outgoing email settings)
Value: Copy the long string provided by UserDeck exactly
TTL: 3600 or default
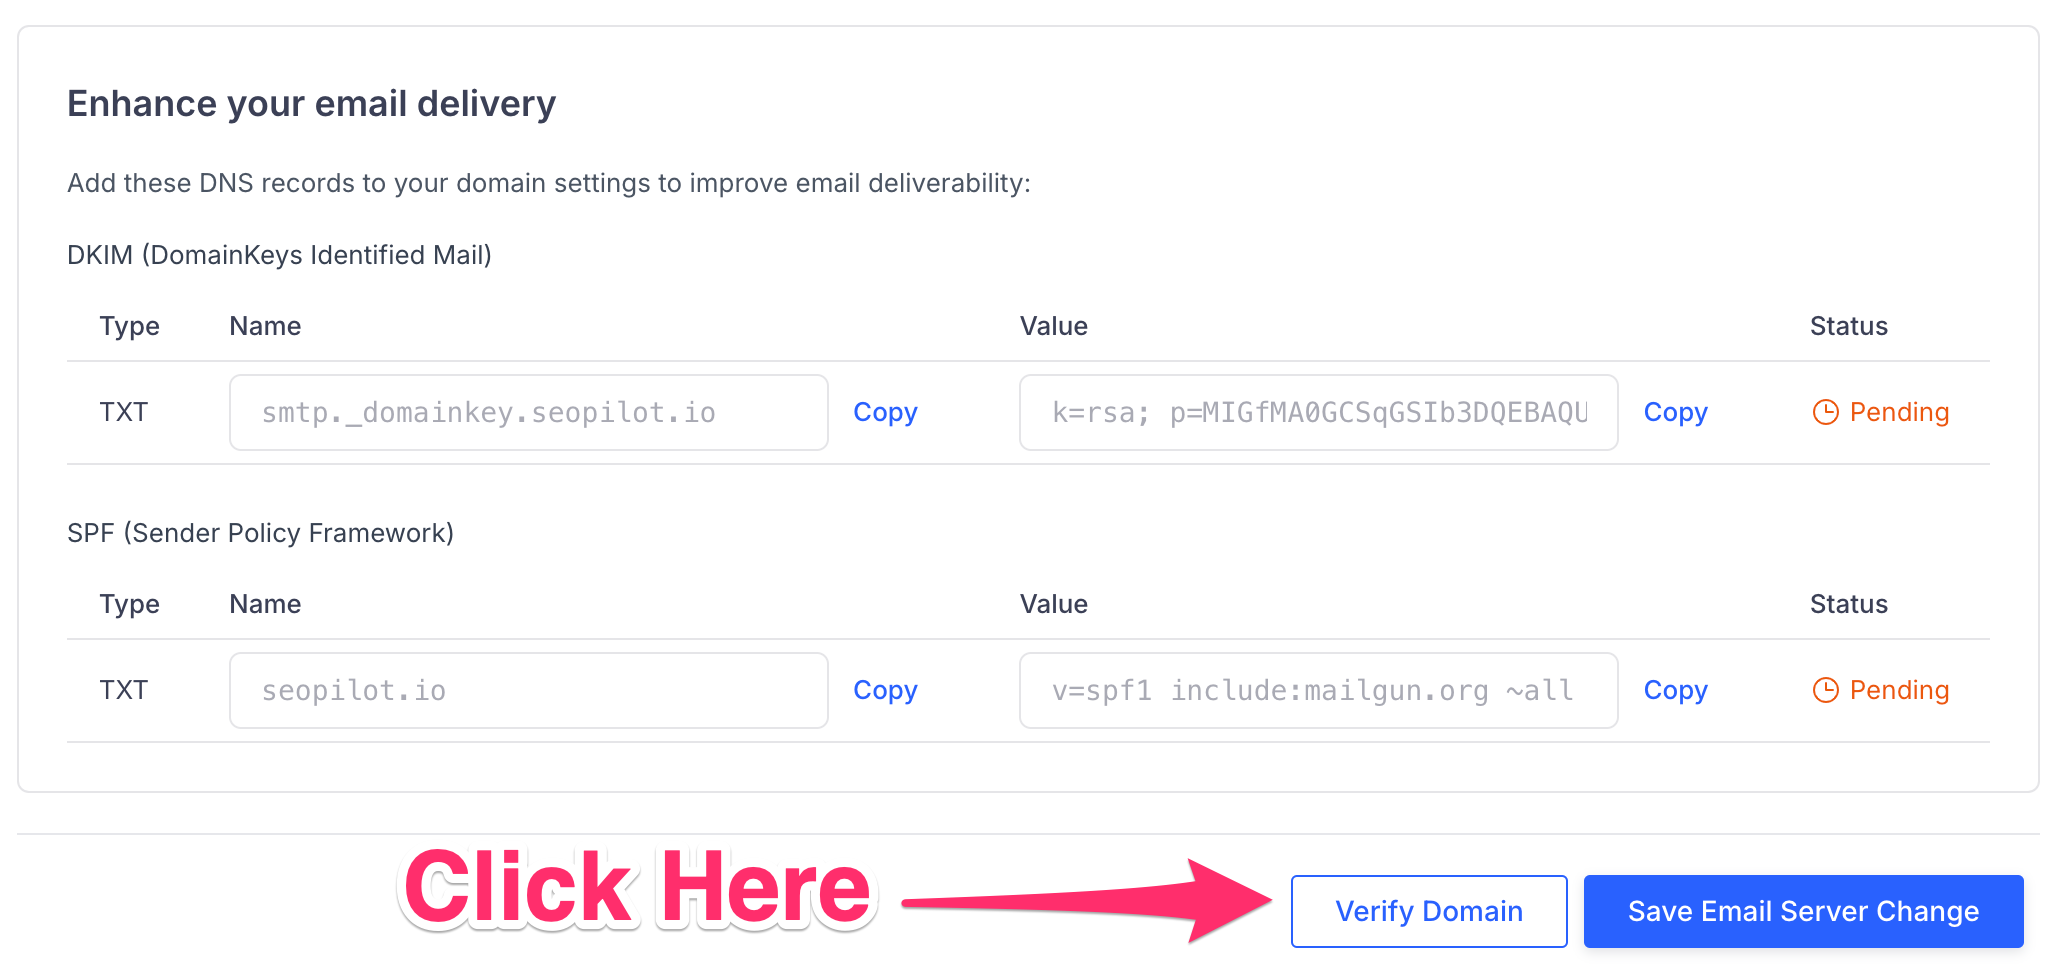
Verify Your Domain - After configuring your SPF and DKIM settings, click Verify Domain to ensure everything is correct. UserDeck will check your DNS records.
![]()
Once you click on "Verify Domain" - the Status for the DKIM and SPF records will change to "Verified" and you're done! If the status stays as pending, you may need to wait a little longer for the DNS changes to propogate through the internet. Check that you have copied all of the information correctly.
By following these instructions, you can effectively set up outgoing email in UserDeck. Contact our support team with any questions or issues.
Configuring DMARC Record - For DMARC configuration, please refer to our dedicated guide as it requires additional steps.
Note: DNS changes may take time to propagate (sometimes 24-48 hours).
Configuring SPF, DKIM, and DMARC for Gmail
You may already have configured SPF, DKIM, and DMARC values with your Gmail account, and if you already have completed those steps, you can ignore this section. Here are some instructions if you haven't completed these steps with your Gmail account:
Gmail SPF Configuration:
Follow the instructions in Google's SPF setup article.
Gmail DKIM Configuration:
Follow the instructions in Google's DKIM setup article.
Gmail DMARC Configuration:
Follow the instructions in Google's DMARC setup article.
Configuring SPF, DKIM, and DMARC for Custom SMTP
For your alternate email service, you may also have already configured SPF, DKIM, or DMARC values for your email account. If you've already completed those steps, you can ignore this section. If you haven't already, the exact configuration steps vary by provider, and if you need more specific instructions, we recommend you contact your email provider for help, but here are some common examples:
Custom SMTP SPF Configuration:
Research your provider's SPF include statement:
SendGrid:
include:sendgrid.netMailgun:
include:mailgun.orgAmazon SES:
include:amazonses.comMicrosoft 365:
include:spf.protection.outlook.com
Combine with existing records:v=spf1 include:spf.protection.outlook.com include:spf.userdeck.com ~all
Custom SMTP DKIM Configuration:
Access your email provider's control panel
Look for DKIM or Email Authentication settings
Generate DKIM keys for your domain
Add the provided records to your DNS
Enable DKIM signing in your provider's settings
Custom SMTP DMARC Configuration:
Standard DMARC configuration applies:
Start with monitoring mode:
v=DMARC1; p=none; rua=mailto:reports@yourdomain.comReview reports to ensure legitimate email passes authentication
Gradually strengthen policy:
p=quarantinethenp=reject
Testing Your Setup
Once you've configured your desired outgoing email option, test your email delivery:
Send a test email from UserDeck to a different email address you have control over by creating a new conversation
Check that it arrives in the inbox (not spam)
Verify the "From" address shows correctly
Reply to the test email and confirm it creates a ticket in UserDeck
Use mail testing tools like mail-tester.com for detailed analysis
Troubleshooting Common Issues
Emails Landing in Spam
Verify all SPF, DKIM, and DMARC records are properly configured
Check your domain reputation using tools like Google Postmaster
Avoid spam trigger words in subject lines and content
Ensure you're not sending too many emails too quickly
Authentication Failures
SPF Fail: Check you've included all services that send email for your domain
DKIM Fail: Verify the DKIM record was copied exactly without extra spaces
DMARC Fail: Ensure your DMARC policy aligns with SPF/DKIM settings
Connection Errors
Verify SMTP credentials are correct
Check if your provider requires app-specific passwords
Ensure correct port and encryption settings
Best Practices
Start with monitoring: Use DMARC
p=noneinitially to monitor without affecting deliveryGradual implementation: Test with internal emails before customer communications
Regular monitoring: Review DMARC reports weekly to catch issues early
Keep records updated: When changing email providers, update DNS records immediately
Document your setup: Keep a record of your email configuration for future reference
Need Help?
If you encounter issues setting up outgoing email:
Take screenshots of your UserDeck email settings
Copy any error messages exactly
Note which email option you're trying to configure
Contact our support team with this information
By following these instructions, you can effectively set up outgoing email in UserDeck with proper authentication that ensures reliable delivery to your customers' inboxes. Contact our support team with any questions.